Views: 0 Author: Site Editor Publish Time: 2025-10-27 Origin: Site


In precision machining, the Swiss-type CNC lathe (also known as a sliding headstock lathe) has long been recognized for its capability to produce small, high-precision parts with tight tolerances and excellent surface quality. Traditionally, most Swiss-type machines feature a single spindle and a single tool post, focusing on continuous front-end machining of bar stock supported by a guide bushing.
However, as demand for productivity and complex part geometry has increased, dual-spindle, dual-turret Swiss CNC lathes have emerged. These machines can perform simultaneous front and back machining, significantly improving throughput and reducing cycle times.
While both machine types share the same fundamental Swiss sliding-head mechanism, their precision characteristics and test methodologies differ substantially. Evaluating the precision of a dual-spindle dual-turret machine involves additional variables—synchronization, spindle alignment, and transfer accuracy—that do not exist in single-spindle configurations.
This article analyzes and compares the precision testing approaches for dual-spindle dual-turret Swiss CNC lathes versus traditional single-spindle designs.

Before discussing precision testing, it is essential to understand the structural distinctions between the two architectures.
Feature | Single-Spindle Swiss Lathe | Dual-Spindle, Dual-Turret Swiss Lathe |
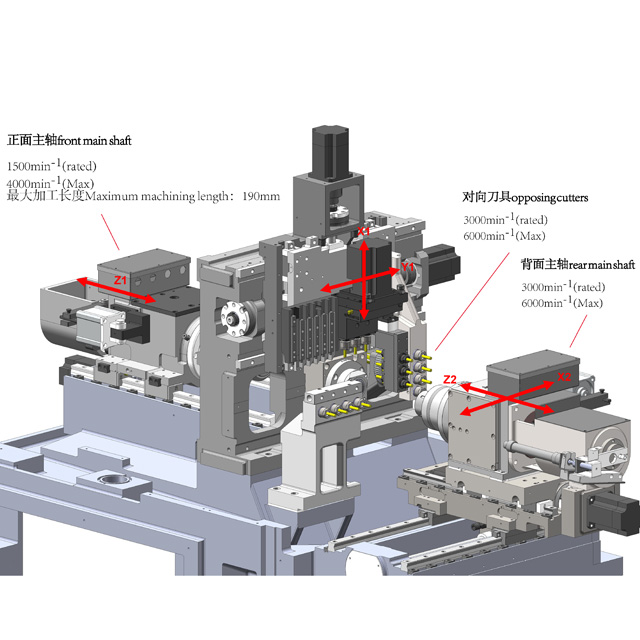
Spindle System | One main spindle + guide bushing | Main and sub-spindles + guide bushing |
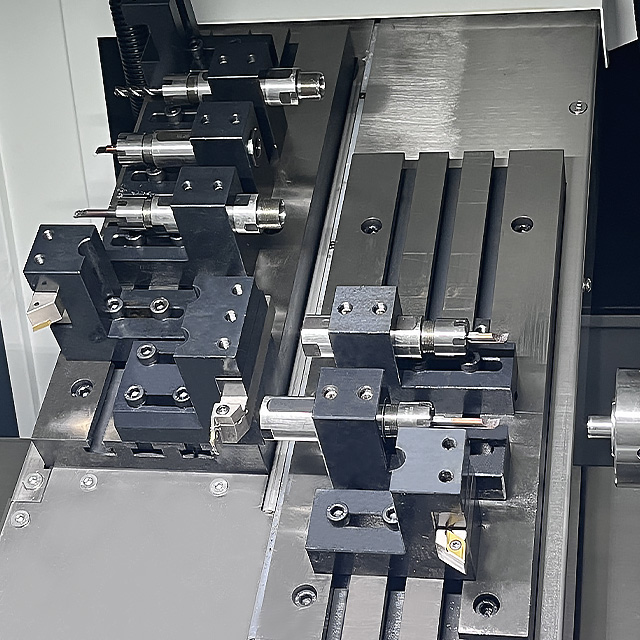
Tool System | Single tool post | Front and rear tool posts (turrets) |
Machining Method | Front-end machining only | Front- and back-end machining simultaneously |
Workpiece Transfer | None | Requires synchronized handover between spindles |
Control Axes | Typically 5–7 | Up to 10–12 (including both spindle/turret groups) |
The addition of a sub-spindle introduces a new kinematic chain, which makes precision evaluation more complex. In the dual-spindle design, both machining systems must maintain independent precision while also aligning perfectly during the transfer process.
The precision of a Swiss-type CNC lathe can be categorized into two broad areas:
Geometric Precision – the inherent mechanical accuracy of the spindle, slides, and guide components.
Machining Accuracy – the resulting dimensional and geometric quality of the finished workpiece.
While the single-spindle machine primarily focuses on geometric precision relative to one spindle and its tool post, the dual-spindle system introduces coordinated precision between two spindle-tool assemblies.
Therefore, the testing objectives differ as follows:
Testing Objective | Single-Spindle | Dual-Spindle |
Spindle runout and alignment | 1 spindle | 2 spindles + inter-spindle coaxiality |
Tool-to-spindle center accuracy | 1 tool system | 2 tool systems, each referenced to a different spindle |
Transfer alignment | N/A | Required (main–sub spindle transfer) |
Synchronization accuracy | N/A | Required (servo timing and handover) |
Thermal deformation | Single source | Multiple sources, interlinked heat effects |
Below are the primary test items for both configurations and the specific focus differences.
Test Parameter | Single-Spindle Swiss | Dual-Spindle Dual-Turret Swiss | Notes |
Spindle Radial Runout | Measured on main spindle | Measured separately on both spindles | Each spindle’s performance must be characterized individually. |
Guide Bushing Concentricity | Aligned to main spindle axis | Must align to both spindle axes | Misalignment between guide bushing and sub-spindle leads to transfer error. |
Tool Position Accuracy | One reference (main spindle centerline) | Two independent references (main & sub) | Requires calibration of both turrets. |
Linear Axis Repeatability (X/Z) | X1, Z1 | X1/Z1 and X2/Z2 for both turrets | Dual-axis systems must be synchronized in testing. |
Transfer Precision | Not applicable | Critical – measures coaxiality and length error between front and back machining | Tested using custom transfer test pieces. |
Thermal Drift | Mainly from main spindle | Dual-source (main and sub spindle heating) | Requires long-term thermal stability testing. |

Single-Spindle: The main spindle centerline is the sole geometric reference for all measurements.
Dual-Spindle: Both spindles must share a common reference coordinate system, and alignment is verified using coaxial alignment gauges or laser interferometry.
Single-Spindle Test Bar: Typically a simple stepped shaft or ring to measure roundness, straightness, and concentricity.
Dual-Spindle Test Bar: A dual-section part machined from both spindles, requiring precise measurement of the junction’s coaxiality and axial alignment.
Coordinate Measuring Machine (CMM)
Laser interferometer for linear positioning accuracy
Spindle analyzer for rotational runout
Thermal imaging or temperature sensors for drift monitoring
Optical or contact alignment tools for main–sub spindle coaxial verification
Dual-spindle systems require more stringent temperature control, as each spindle generates heat independently. The cumulative thermal deformation may affect transfer accuracy, so precision tests must include thermal stabilization periods and long-duration stability tests.
The main sources of error that affect precision in dual-spindle machines include:
1.Spindle Synchronization Error – Phase or timing mismatch during handover can introduce micrometer-level misalignment.
2.Workpiece Transfer Misalignment – Mechanical or servo lag during cut-off and pick-up creates axial or angular errors.
3.Thermal Coupling – Two spindle motors and dual turrets create overlapping heat zones that affect alignment stability.
4.Turret Zero-Point Shift – Independent tool stations may experience drift, especially if both turrets operate under different cutting loads.
5.Servo Delay or Backlash – Multi-axis interpolation errors can influence synchronization precision.
These factors make dual-spindle testing not only a static geometric evaluation but a dynamic, real-time synchronization assessment.
A common method to assess the precision of main–sub spindle transfer is as follows:
Machine a cylindrical bar section on the main spindle (e.g., Ø10 × 20 mm).
Transfer the part to the sub spindle without removing it from the machine.
Machine the rear portion (e.g., Ø10 × 10 mm) on the sub spindle.
Measure:
1.Coaxiality between the two diameters
2.Axial length deviation between the machined sections
3.Surface finish continuity
A deviation of less than 3 μm in coaxiality between the front and back sections is considered excellent for high-end dual-spindle Swiss-type machines.

In single-spindle Swiss lathes, precision is primarily determined by the rigidity of the headstock, guide bushing alignment, and tool positioning accuracy. The testing process is straightforward, and results tend to be stable once thermal equilibrium is reached.
In contrast, dual-spindle dual-turret machines demand a system-level precision evaluation, where interaction between systems becomes a dominant factor.
Even if each spindle individually meets sub-2 μm runout, a transfer misalignment of 5 μm may still degrade the total machining accuracy.
The key to maintaining precision is synchronization control—ensuring that motion, temperature, and servo response are harmonized between systems.
Therefore, precision testing for dual-spindle machines must not only verify mechanical accuracy but also dynamic coordination accuracy.
The precision evaluation of dual-spindle, dual-turret Swiss CNC lathes is inherently more complex than that of conventional single-spindle machines.
While the single-spindle Swiss lathe focuses on static mechanical accuracy, the dual-spindle configuration introduces multi-axis coordination, transfer alignment, and thermal balance as critical testing parameters.
Key conclusions include:
1.Testing Scope Expansion: Dual-spindle machines require additional tests for spindle synchronization and transfer accuracy.
2.Reference Complexity: Multiple reference coordinate systems must be established and verified.
3.Dynamic Testing: Real-time monitoring of transfer and servo synchronization becomes necessary.
4.Thermal Stability: Multi-source heating demands extended stabilization and temperature compensation.
5.Precision Interpretation: Final machining accuracy depends more on system integration than on individual component precision.
In summary, the evolution from single- to dual-spindle Swiss-type CNC lathes represents not only a leap in productivity but also a transformation in how precision itself is defined, measured, and maintained. Precision testing for such machines must embrace dynamic, system-level evaluation to truly reflect their performance in modern high-precision manufacturing.

